

Membership sites have become an integral part of online businesses, where customers can access exclusive content, products or services after becoming a member. Membership sites provide a recurring revenue stream to the business, and it helps them to create a loyal customer base. Many bloggers are opting for membership site where they sell their top rated content and make passive income.

WordPress provides an excellent platform to create membership sites, and it can be made even better by adding plugins. With so many plugins available in the market, it can be overwhelming to choose the best ones. Here is a review of most famous plugin “MemberPress”.
The best plugin that has created many successful businesses is MEMBERPRESS. Memberpress is verstile and easy to understand.
Get huge discount ! Go to the site below! Purchase memberpress by using our affiliate link and we will install premium theme on your wordpress website – FREE!! —– Huge Discount + FREE Theme

In this blogpost, we learn to create a membership site with wordpress and memberpress plugin. Lets dive in.
Creating a membership site is easy with membership plugin. You’ll have a free content on your website and then a paid content on your website. Membership plugin will lock your paid content behind a wall and only paid members will get access to that content.
This plugin will segregate the traffic of your website and you can earn by selling your content.
If you want to create an art website and you’re an artist then you can provide a full course on oil painting, advanced tutorials to paid members and your website will have other helpful resources that would be accessible to everyone…
For creating a membership website you must have a content strategy in your mind. You must know the value of your content.
Your membership could be one time payment or a recurring payment. You can make your one time payment to be expired at some point in time. Recurring payment is more famous for magazines, news websites, current affair material, food website or any content that’s added consistently. Know your strategy what is good for your website.
One example is a cooking website where many free recipes are available at open access. Some recipes are for free members who signup free at website. And cooking course and digital downloads are available to paid members. Many websites successfully employed this membership strategy to create high earning blogs.
MemberPress is a powerful and feature-rich membership plugin that allows you to create and manage membership levels, restrict access to content, sell digital products, and integrate with popular payment gateways. It also provides detailed reporting and analytics.
Steps to create a winning Membership Site with MemberPress Plugin
Install and Activate the MemberPress Plugin:
Log in to your WordPress admin dashboard.
Go to “Plugins” -> “Add New.”
Search for “MemberPress.”
Click “Install Now” next to the MemberPress plugin.
After installation, click “Activate” to activate the plugin.
Configure General Settings:
Once the plugin is activated, you’ll see a new “MemberPress” menu option in your WordPress dashboard.
Go to “MemberPress” -> “Options” to access the plugin’s general settings.
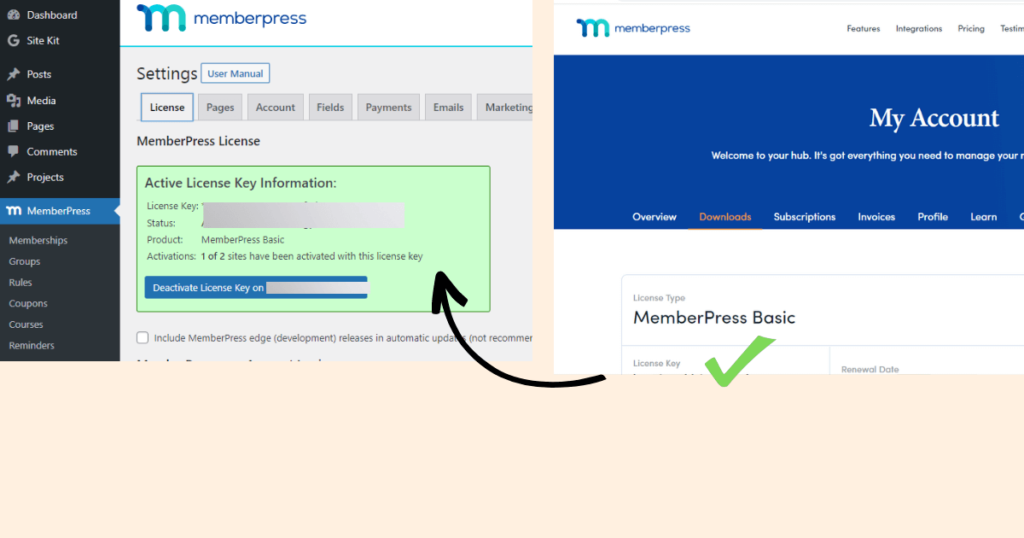
Open a licensed tab. Activate your license key. Get your key from MemberPress Account page on their website. It is a very important step.
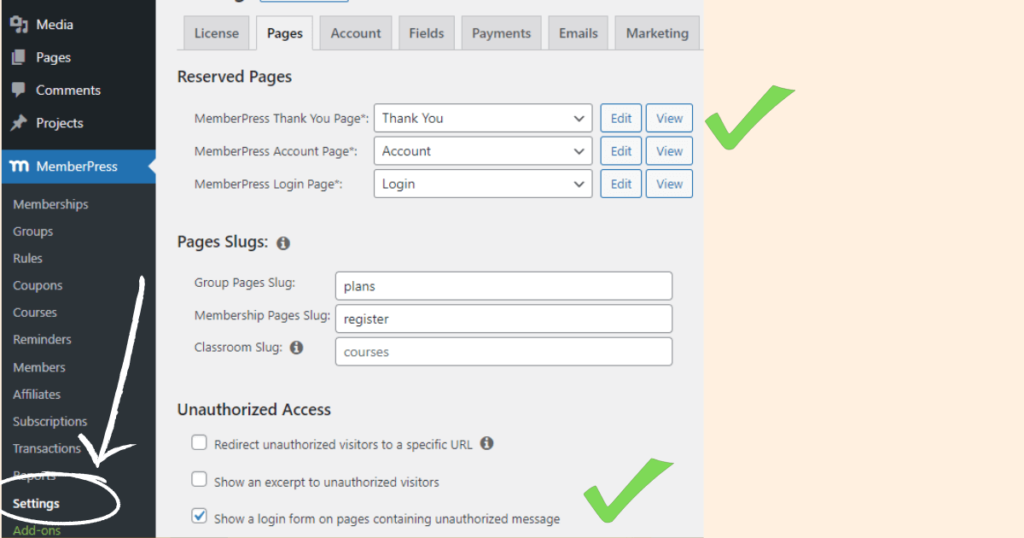
Pages tab: MemberPress comes with some inbuilt PAGES. Thank you Page, Account Page and Login Page. You can edit the information and customize the pages. Under heading “unauthorized access”, check “Show a login form on pages containing unauthorized message”. Now users will see login form if they try to open unauthorized content.
In Account tab, keep things same. You can edit welcome message. It will appear on account page.
Fields tab: Fields are very important. On your account page what info you wanted to take from user when they signup. By default name, email, username and password is there. DON’T CREATE AN EMAIL FIELD. It’s already there. All essential fields are already created. Apart from that for custom fields if you wanted any extra information from the user, you can create a field for that info. You can also select “Type” of field like what type of info you are collecting like phone number, url. Many options are there like dropdown, check box, radio button and file upload. Default value is a value which would be shown in a box on a front end.
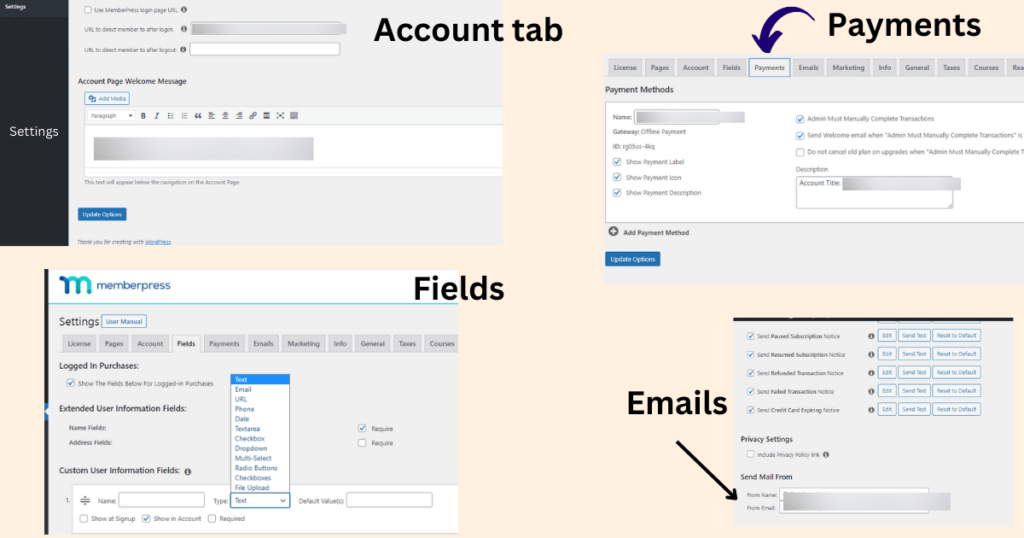
Payment Tab: Inside this tab you will setup your payment gateway. What method you will choose for users to send you money like PayPal or stripe. Or offline payment or any other method.
Email Tab: You will receive these emails. Here you can change email if you don’t want to use admin email address to receive notification emails. You can change “Send mail from”, from which mail the message should be send. “From name” is by default your website name. And you can even change that.
General tab: You can change your currency. In what currency you wanted to take payments.
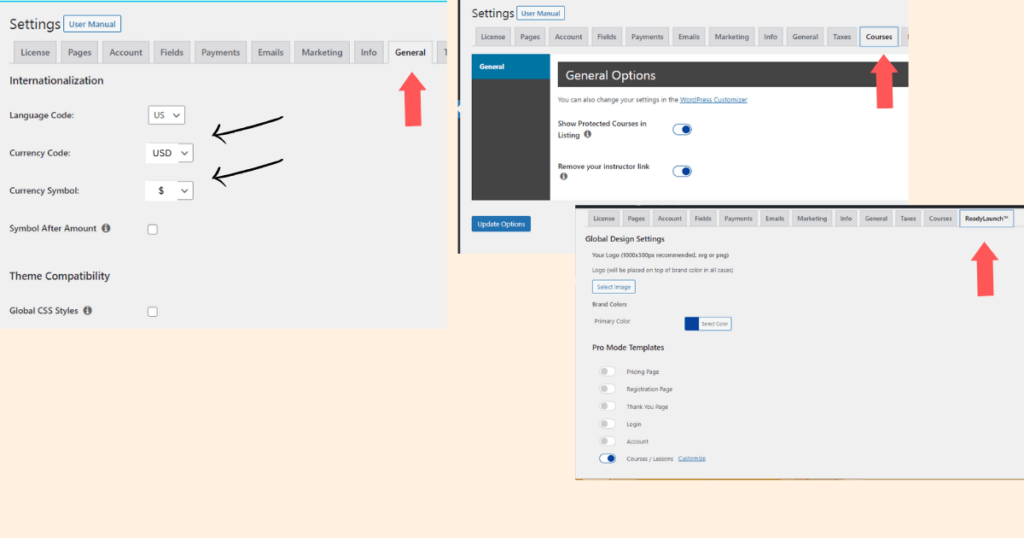
You can create courses with membership add-on COURSES. And turn your website into online teaching platform. No other lms is needed. Memberpress courses will have all the features to make your website an online school where instructors can teach. And you can sell educational pdfs and any digital download material. Still you can create blog along with courses and lock your post inside premium content for paid members. And you can also protect pages. Many other options are there including partial content protection.
Create Membership Levels:
You will have your content ready like post, pages or any digital downloads like pdfs. If you want to create a course, install add-on courses. And create a course with all lessons and quizzes.
In the MemberPress menu, click on “Membership.” Click on the “Add New” button to create a new membership level like Basic for free members and Pro for paid members.
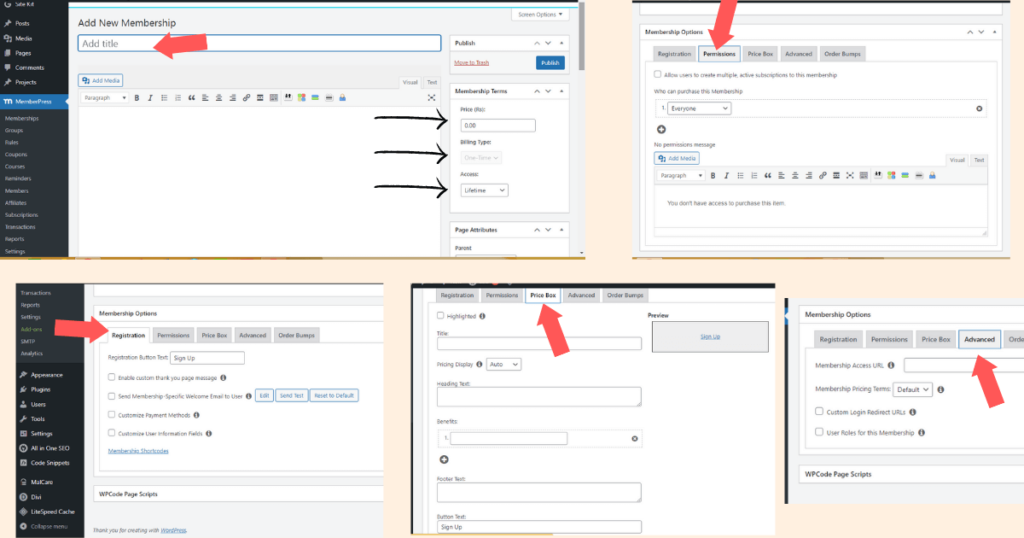
Provide a name for your membership like Basic Membership. And select the pricing details for the membership level. Check the side bar (Membership Terms) where you can set pricing details. Select “billing type” ; one time payment or reoccurring payment for your membership. Select your expiration period or make it life time access.
When you scroll down you can see membership options. It’s very important. if you want to change the button name “Sign Up”, you can change here. You can also edit the welcome message, thank you message. In Registration tab there is something very important. Last option is “customize user information fields“. You remember you created fields in custom fields for account signup in general settings. And now you can select or uncheck fields for that particular membership.
Next is the Permission tab. If “Everyone” is selected, everyone can purchase that membership.
Price Box: Add heading text (e.g Basic Membership) and add benefits related to that membership. On price box, if you check the highlighted, that membership will be highlighted as popular.
Advanced tab: In advanced tab there is “membership access url”. If you want to provide link of purchased content to user at account page, then you can set it up here. “Membership pricing term” is that if you wanted to add any extra text on your table e.g. life time opportunity to get that. check that and edit it.
Your membership link is registration page. When you click on the membership, you reaches to registration page.
Repeat the process to create multiple membership levels if needed.
Create a Group:
You created memberships. Now how users will reach your memberships? create a pricing page. Go to Group. So group is your pricing page where users signup for memberships. You will create a group and add your memberships. Name your group like “Pricing Page” or any title you like. You are going to add your membership in group page which is your pricing page.
What is upgrade path? If checked, your users have to upgrade. They can’t have multiple memberships.
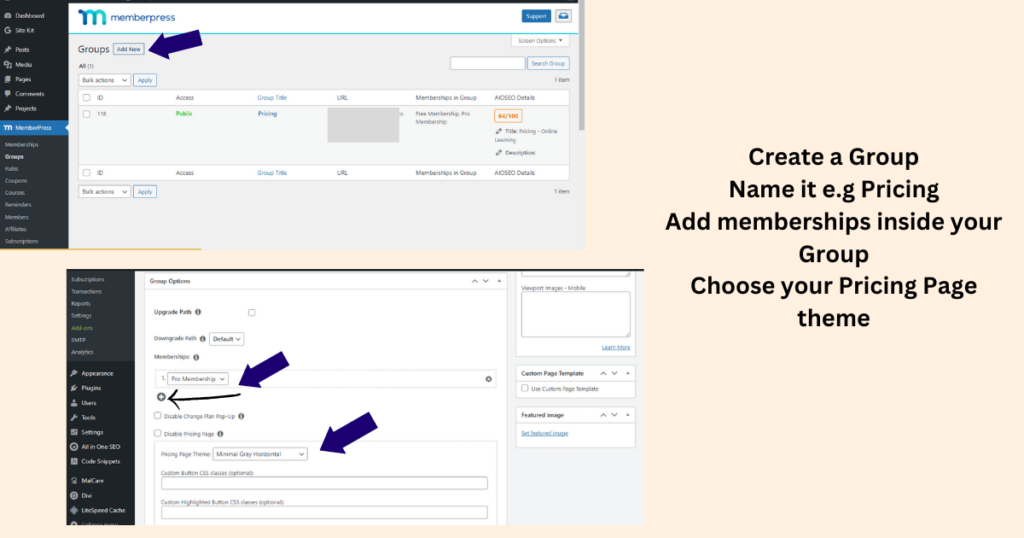
Leave downgrade path as it is. If the paid membership is expired, they will be automatically downgraded.
You can customize your pricing table. Choose a theme like minimum grey horizontal.
Click on group price boxes short codes. There are two codes. If you want to create separate price page, you can paste 2nd code in that page. And pricing table will appear there. You have to paste a code inside a text editor.
What 1st code do? If you want to add anything extra on that same page, you can use 1st code. With the help of the 1st code you can add anything to price table below and above. There is a text editor above. Whatever you type on that editor and then insert code (code is for pricing table) to modify your pricing page . In this way content is added below or above the table.
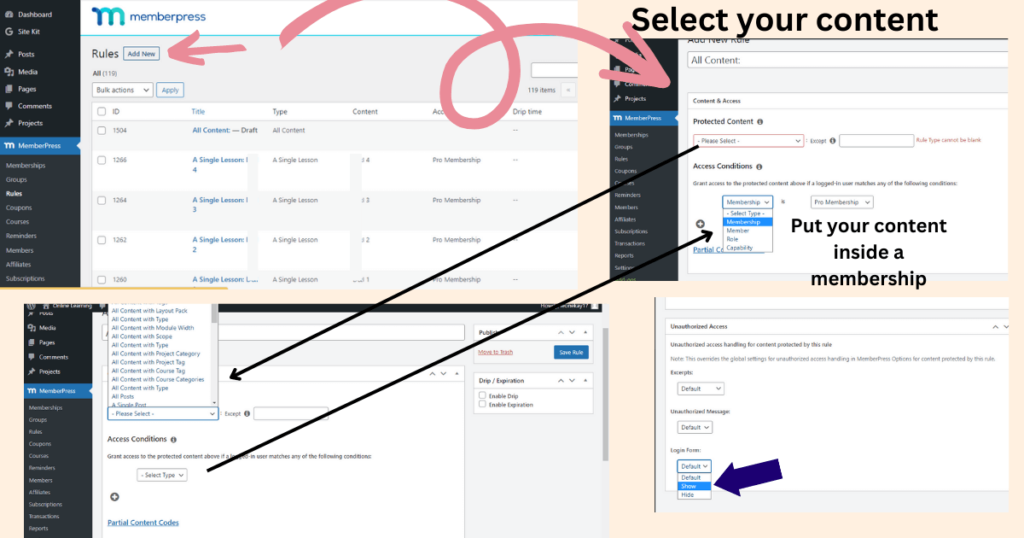
Scroll down and there is box named “memberPress unauthorized access on the group pricing page“. You can see here “login form”. You can show or hide it. If checked, users not signed in, will see the login option. When the user is Unauthorized to see a content, they will see the login form.
Create Rules to protect content:
Here comes the connection building. Every thing is there. Content and membership. Now you have to bridge between these two by locking your content inside memberships. Your rules will protect content and restrict access. By using rules, you will protect your content inside particular membership.
“Access rules” define what content members can access based on their membership level.
In the MemberPress menu, click on “Rules.”
Click on the “Add New” button to create a new access rule.
Protected Content: First select which content you want to protect. Many options are there. You can protect pages, post, specific post category, or specific tag of post, all courses, specific course, specific lesson and many other options.
Access Conditions: Select the membership level(s) that should have access to specific content or categories. Put your content you want to protect inside a specific membership and save the access rule.
Coupons and Reminders:
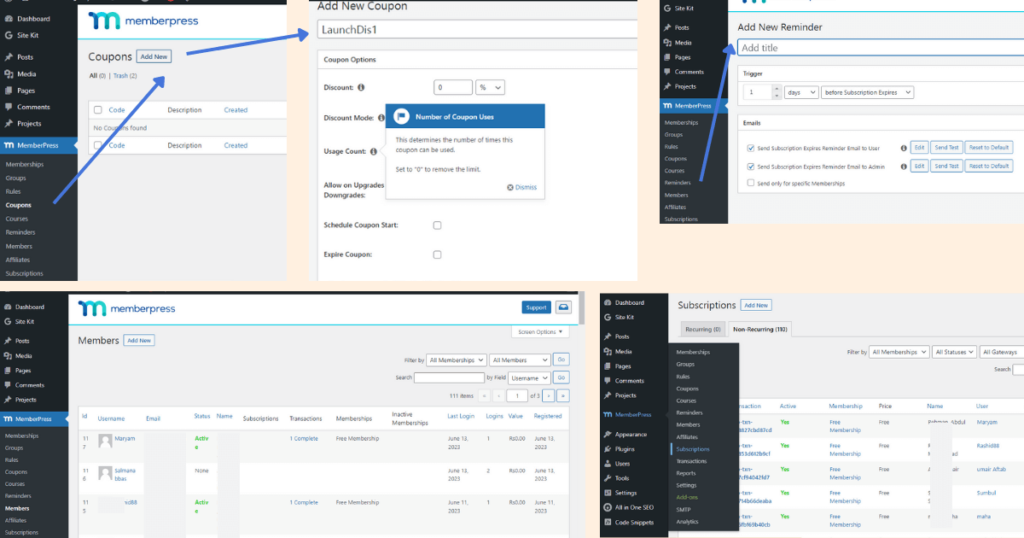
While creating memberships, it’s very fascinating to create coupons. Coupons let the users avail discounts. And they are triggered to buy the membership if they have discount deals. With MemberPress you can create coupons and set the start date, end date and no of times that coupon can be used. You can also set percentage of discount or discreet value.
You can also set new reminders apart from the default ones from MemberPress.
Members, Subscriptions and Reports
You can check your members and see all the details of their sign up and their subscription. And you can check the complete report of your membership site.
Create Certified Courses:
You can add certificates with your courses. After completion your members can download certificate and you can sell certified courses.
MemberPress Pages on main menu:
MemberPress provides default pages for membership-related activities like registration, account management, etc.
Add your Pricing page to your main menu. So that users can register for a membership. Go to Appearance > menu. Create a main menu. Add your Group Pricing Page to your menu. Edit menu Heading of Pricing Page like Pricing or Sign Up.
Integrate with Email Marketing Service (Optional):
MemberPress integrates with popular email marketing services like MailChimp, AWeber, etc.
In the MemberPress menu, click on “Options” -> “Emails.”
Configure your email marketing service settings to capture member details and automate email campaigns.
Test and Launch:
Before launching your membership site, thoroughly test the registration, payment, and access workflows.
Ensure all pages, access rules, and payment processes are functioning correctly.
Remember to consult MemberPress documentation and support resources for more detailed instructions on using the plugin effectively.
More info > WORDPRESS MEMBERSHIP PLUGIN


